


NEXT
How to connect a Player to AD+Sign ProHow to Setup Your DS-2 Player with a USB Mouse
DS-2
Before we begin
Make sure that:
- Your DS-2 Player is connected according to the recommended diagram and ready for use
- Your DS-2 Player is either connected to a wired network or will have access to a wireless network
- The AD+Sign App is downloaded on your mobile device
- Your device has access to the same IP network as the DS-2 will be connected to
Starting Setup
- Power your connected display or TV and select the correct video input
- With the DS-2 powered off, you will likely see a 'No Signal' warning on the display - this is normal.
- Power the DS-2 and wait for the product to fully load, observing the status on your connected display. When ready, the DS-2 will ask you to set up the device using either the AD+Sign app or a mouse and keyboard.
The first boot of a brand new DS-2 may take up to 2 minutes to fully initialise and configure runtime data. You may see a blank screen during this time.
If you are using an Ethernet wired network and you're not using a static IP address, the DS-2’s IP address will be shown.
If you are using WiFi, or the network has no DHCP server, you will see a message indicating that the DS-2 is not connected to the network yet. This is normal.
Using a USB Mouse
- Connect a USB mouse to the USB ports of the DS-2.
- Using the mouse cursor, click on the 'Setup using USB Mouse / Keyboard' button shown on the connected display
- The DS-2 will display the option to use Cloud Connected mode. Click the 'Continue' button.
- On the next screen set a name for the DS-2 and a 6-digit PIN, then click the 'Continue' button.
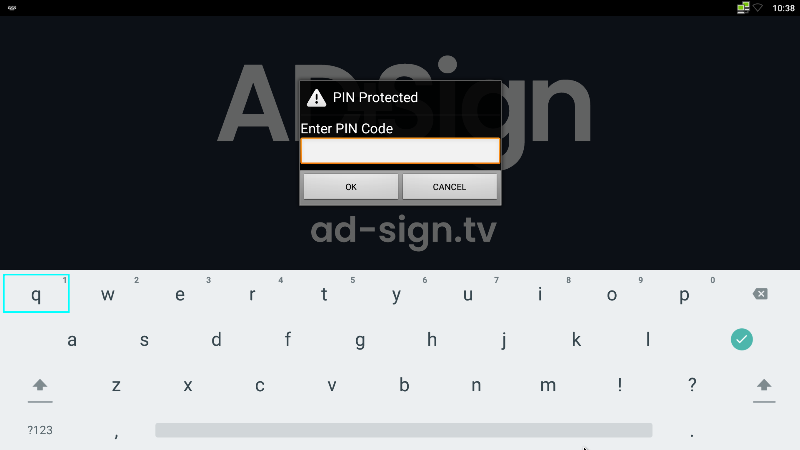
Setting a DS-2 PIN - Click the 'Finish' button to start the main DS-2 App.
If you are using an wired Ethernet connection and you have not set a static IP address, your DS-2 setup is now complete and you can skip the remaining steps.
- Using the mouse, click anywhere on the screen to reveal the DS-2 app menu.
- Click the 'DS-2 Settings' option and enter your 6-digit PIN.
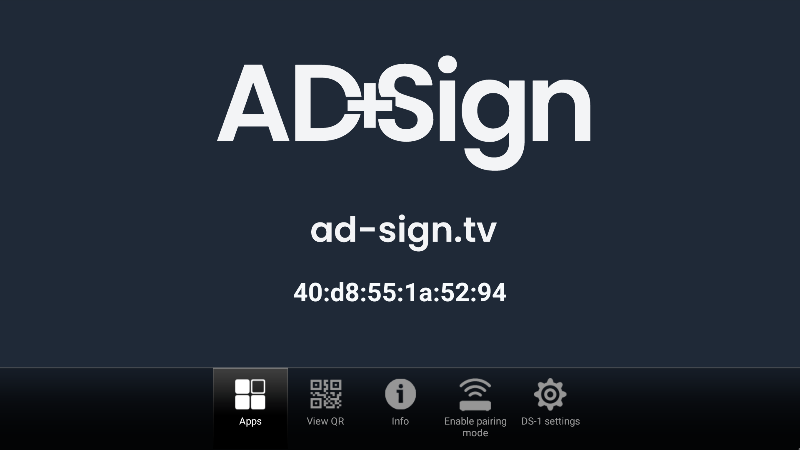
DS-2 on-screen menu
At any point you can use Right-Click to navigate back to the previous page.
- In the Settings page, click the 'Network' menu item.
- Choose either the wired Ethernet or WiFi settings menu item to suit your network connection.
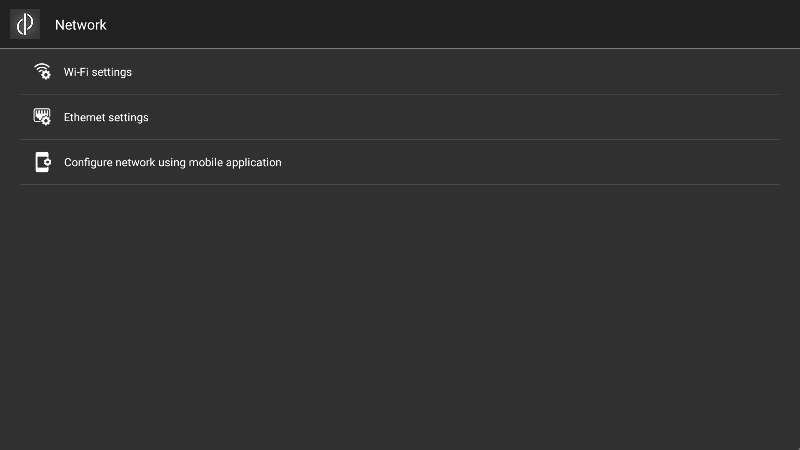
DS-2 Network Settings - Enter the network settings to suit your network requirements.
- Once the correct network settings are confirmed, use Right-Click to navigate back to the main DS-2 app page.
The initial setup of your DS-2 is now complete